
Pet Toys from Yarn Scraps I
Every time I finish a t-shirt yarn project I end up with scraps that I know that I won't be able to use in a new project, but I keep them just in case! If you are like me here is your chance to finally put them to use and make your pet even happier with these fun toys! =D
Note: Originally I wanted to share all the toys together in the same post, but because it was turning out to be a long post, and to be easier for you to find them I decided to separate them into two posts. This is the first part and latter this week I will post the second part. Enjoy! =)
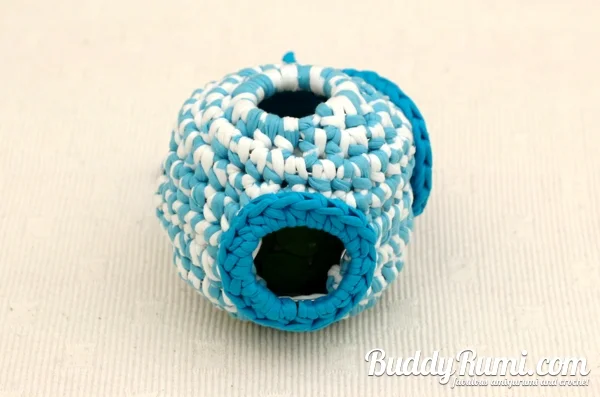
Interactive Pet Ball
Materials:
8mm hook
T-shirt yarn
Galvanized wire (diameter of 1.8mm)
Craft wire
Wire cutter
Yarn needle
Sewing needle and thread
Felt
Hot glue gun and glue
Small toy (preferably one that rattles)
Abbreviations (US terminology):
Rnd: round or rounds
st: stitch
ch: chain
slst: slip stitch
sc: single crochet
hdc: half double crochet
inc 2: increase by working two stitches into the same stitch.
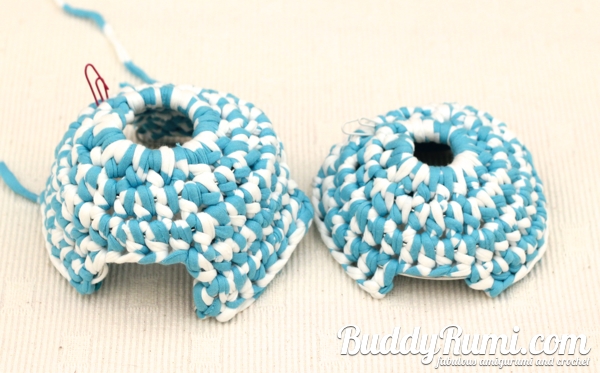
Cups (make 2)
The cups are worked in continuous rounds. Don't join rounds at the end. You may want to use a marker to indicate the beginning of the rounds. All stitches are worked in both loops and over the galvanized wire.
Ch10, slst to the 1st st to form a circle
Rnd 1: 16hdc in the circle (16st)
Rnd 2: (1hdc, inc 2) x 8 (24st)
Rnd 3: (2hdc, inc 2) x 8 (32st)
- 2sc, 1slst, needle join and weave in ends.
Panels for the First Cup
The panels are worked in rows. All stitches are worked in both loops and over the galvanized wire.
Panel 1
Row 1: join with hdc to where you made the needle join at the end of the cup, 7hdc, ch2, turn (8st)
Row 2: 8hdc (8st)
- Finish off and leave a long tail.
- Bend the wire over the last row, cut with a bit of excess wire.
Panel 2
Row 1: Skip 3 st to the left of the first panel and join with hdc, 7hdc, ch2, turn (8st)
Row 2: 8hdc (8st)
- Finish off and leave a long tail.
- Bend the wire over the last row, cut with a bit of excess wire.
Panel 3
Row 1: Skip 3 st to the left of the second panel and join with hdc, 6hdc, ch2, turn (7st)
Row 2: 7hdc (7st)
- Finish off and leave a long tail.
- Bend the wire over the last row, cut with a bit of excess wire.
Panels for the Second Cup
The panels are worked in rows. All stitches are worked in both loops and over the galvanized wire.
Panel 1
Row 1: join with hdc to where you made the needle join at the end of the cup, 7hdc (8st)
- Finish off and weave in ends.
Panel 2
Row 1: Skip 3 st to the left of the first panel and join with hdc, 7hdc (8st)
- Finish off and weave in ends.
Panel 3
Row 1: Skip 3 st to the left of the second panel and join with hdc, 6hdc (7st)
- Finish off and weave in ends.
The two halves should look like this:
Assembling the ball
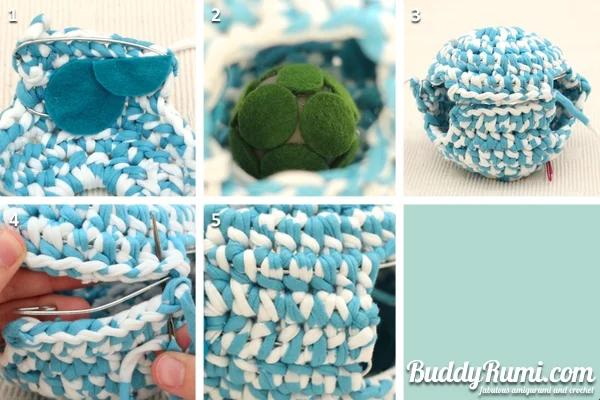
1. Bend all the wire tips and cover them with the felt using the hot glue gun.
2. Place the small toy inside the ball. I chose a plastic ball that rattles.
3. Place the 2 halves on top of each other making sure that the correct panels are aligned (remember that one of the panels, on each side, only has 7 stitches).
4. Use the long ends left at the end of the first half of the ball to sew the 2 halves together. Make sure to catch the wire left on top of the panels on the first half.
5. Sew all the panels and weave in ends.
Finishing
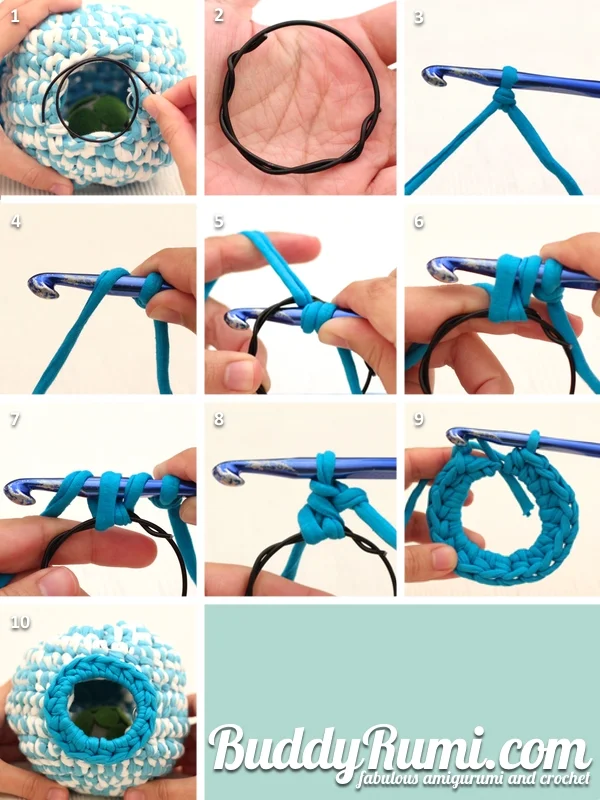
1. Cut a length of craft wire long enough to make a circle to cover the windows between the panels. Leave excess wire on both ends.
2. Wrap the excess ends on the opposite sides of the wire, closing the circle. Make sure the tips of the wire are flush.
3. Make a slipknot on your hook.
4. Yarn over. Secure the yarn with your fingers to make sure that it doesn't slide.
5. Insert the hook into the circle.
6. Yarn over and pull up a loop.
7. Yarn over.
8. Pull yarn through all loops on the hook. The first half double crochet is completed.
9. Continue to work half double crochets into the circle until it is completely covered. Needle join to the first stitch and weave in the ends.
10. Sew the circle on top of the window covering its edges. Repeat for the other two windows to complete the ball.
Here is a taste on what's coming in part 2:
Leeloo is enjoying all her new toys!!! I'm sure your furry buddies will too!!! =D