
How to… Change Color
One of the things that bother me the most in crochet is seeing exactly where a color change was made. Today I want to share with you several techniques I learned to change color in your amigurumi and their pros and cons. Lets start!
Basic color change
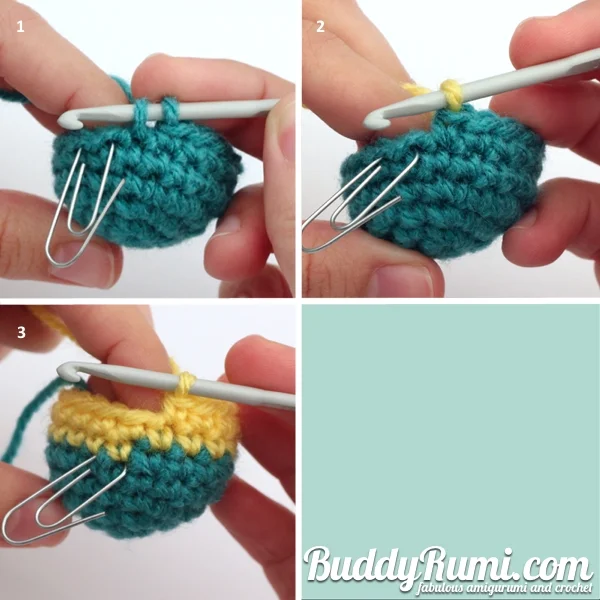
1. Work your last stitch until you have two loops on your hook.
2. Finalize the last stitch with the new colored yarn.
3. Continue to work as usual.
In this technique you can see very clearly where the change was made, the colors end and start abruptly and on different heights. I only use this technique to add more yarn of the same color, and when I'm absolutely sure that the change is not going to be seen in the finished buddy.
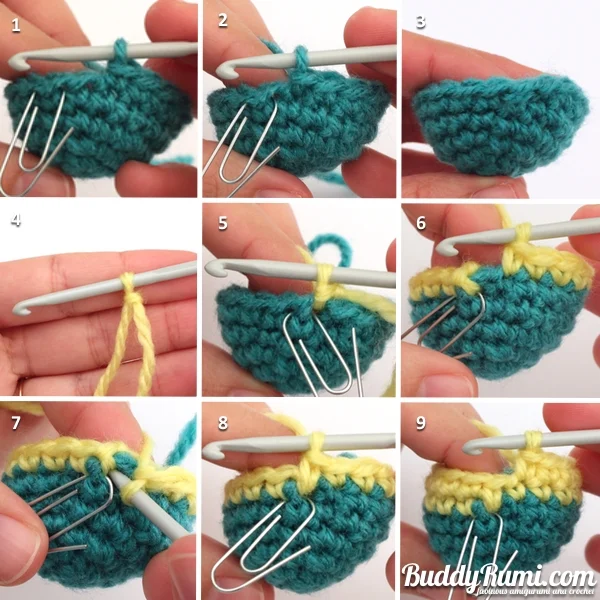
Slip stitch plus back loops

1. Like in the previous technique finalize your last stitch with the new color. Insert your hook into the next stitch only grabbing the back loop (the one farther from you).
2. Work a slip stitch.
3. Finish the round working slip stitches all around and only in the back loops.
4. Insert your hook into the next stitch only grabbing the back loop and single crochet. Finish this round working single crochets all around and only in the back loops.
5. Continue to work as usual.
Using this technique makes a very crisp color change, but you can still see where the change was made and they are still on different heights. Also I don't like the horizontal bumps (the front loops of the slip stitches) in the second color.
With simple modifications these can be minimized:

1. Slip stitch plus back loops.
2. Slip stitch plus back loops, first modification: The only difference is that the last stitch worked with the first color is a slip stitch. This modification brings the height of the last stitch down making the color change less abrupt.
3. Slip stitch plus back loops, second modification: The only difference is that the first round of single crochets with the second color was worked in both loops of the slipstitches. This eliminates the horizontal bumps of the second color.
At this point I have to say that another thing that really bothers me in crochet is change of texture that is not intentional. The only situation I can see myself using any variation of this technique is where I want to make a clear demarcation between different parts of my buddies, like between clothes and skin (socks to skin, panties or shorts to skin). Another thing I don't like in this technique is the extra round we need to make which means we spend more yarn and time on it, and that brings me to my favorite technique for changing yarn color. =)
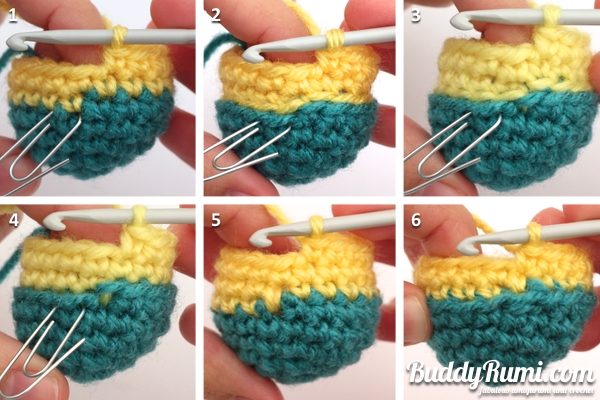
Slip stitch and needle join
1. Work all the stitches as usual with the first color up to the next to last stitch.
2. For your last stitch work a slip stitch to bring the height of the stitches down.
3. Cut the yarn leaving a long tail and make a needle join (aka invisible join).
4. Make a slip knot on your hook with the second color.
5. Join the second yarn to your piece with a slip stitch.
6. Work the rest of the round as usual.
7. Work the first stitch of the next round in the same space of the slip stitch worked with the second color.
8. Complete the single crochet.
9. Continue to work as usual.
With this technique the change of color is more undefined, we don't waste yarn in stitches that are not going to be seen and it's simple! I use this technique if I want to change color once or twice in my buddies. And if I want to have that clear demarcation between clothes and skin I just work in the back loops for the first round with the second color!
Comparing all the techniques:
1. Basic color change.
2. Slip stitches plus back loops.
3. Slip stitches plus back loops, first modification.
4. Slip stitches plus back loops, second modification.
5. Slip stitch plus needle join.
6. Slip stitch plus needle join, first round of second color worked in the back loop.
The last two are definitely my favorites! The first one I only use when adding more yarn of the same color, and I don't think I ever used the other three for the reasons I stated above! But if I need to change colors more than once or twice, to make stripes, my all-time favorite technique is still the Barber Pole or Helix stripes!
Hope you find these helpful!
If you have suggestions for what the next tutorial should be or any questions leave a comment below! =)