
How to... Inverted Crochet Technique

If you're familiar with my "buddies" you must have already noticed that I'm nitpicky about their texture.
I prefer to work with small stitches because they give more resolution to the doll and make it more difficult for the stuffing to come through. I also prefer to work in rounds without turning the work because it gives an uniform texture to the piece (the front of the stitch is always facing the same side). Although it is sometimes inevitable I didn't like to work in rows because it gives the piece a striped texture.
Previously I had developed the technique that I call Travelling Slip Stitch although I liked the results, it evolved making an extra row of slip stitches (the return row) that ended up hidden under the next row. With this technique we would spend more yarn and more time on the piece, so I wasn't yet satisfied.
I tried to learn how to crochet with the left hand. Alternating between working from right to left with the right hand and from left to right with the left hand gives the effect I want (even texture) but it was really frustrating and I was working on a piece that I needed to finish quickly so I had to come up with something else.
I started to observe closely where the yarn was going while I crocheted and started to invert the steps.
After several trials and errors I came up with a new and improved technique. I've eliminated the return row, that way we spend less time and yarn on a piece of the same size, and we can work all the rows with the same hand.
At first it might seem counterintuitive but you'll see that you get the hang of it pretty quickly! Check it out!
Grabbing the piece

I grab the piece between the thumb and index finger, use the thumb to keep the yarn always to the right of the hook and use the pinky and ring finger to control the tension of the yarn.
The technique
In this tutorial I'm working with the single crochet, but this technique can be used with any other stitch.
After chaining for the necessary number of times, work the first row as you normally would. Chain one, turn and bring the working yarn to the front of the piece.
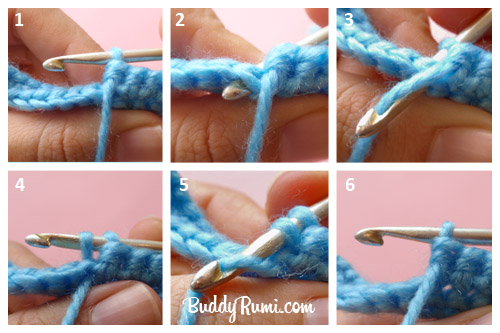
1. With the help of your thumb keep the working yarn always to the right side of your hook.
2. Insert the hook from the back to the front of the next stitch.
3. Yarn over - make the hook go under the working yarn and grab it.
4. Bring up a loop - after grabbing the yarn in step 3 pull it to the back of the piece.
5. Yarn over - make the hook go under the working yarn and grab it.
6. Pull the yarn through the two loops on the hook.

The second and forth row were worked with the Inverted Crochet technique
As you can see, all the rows show the characteristic "v" of the single crochet.

Rectangle piece worked the usual way.
When working in the usual way the front ("v") and back (inverted "v" with horizontal bar on top) of the stitches can be seen.

In a three dimensional piece we work the Inverted Crochet technique in the edge furthest from us and working from right to left using the same steps described above in the tutorial.
Give it a go and share your opinion!
Happy Crafting!